 Photopea: Just a Quick Look ...
This is an introductory tutorial for Photopea.com. It covers an overview of several useful features of the program. Among them are:
- Selecting and filling rectangles and circles
- Using layers to isolate parts of images.
- Using Draw Tools to accent your designs
- Feathering images to create soft edges
- Changing color swatches for foreground
Experiment... Explore... Don't worry about perfection! You should have a satisfactory outcome in about 20 minutes.
STEPS:
- Go to Photopea.com.
- Choose the "Open From Computer" menu, and open your desired image.
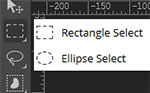 From the Toolbox on the left, hold down the Rectangle Select and choose
Ellipse Select. - From the Control palette at the top, set a Feather of around 25.
- Drag a marquee selection around the area of the photo you want to keep.
- Choose SELECT/Inverse.
- Press DELETE on the keyboard. Then choose SELECT/Deselectl.
- From the Layers Palette, add a new layer for the background. Then drag that layer to the bottom of the palette.
 Then fill it with a color, such as black.
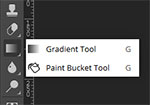
To fill, hold down the Gradient Tool in order to choose the Paint Bucket. Then click anywhere on the layer. - Add a rounded edge rectangle for a label (See the Janet Johnson banner beneath the photo.)
- Choose the Rectangle Tool from the toolbar
- From the Control panel, choose Corner Radius to set the radius to approximately 15.
- Drag to draw the Shape.
 You can change the default Shape color as follows:
- Click on the layer, probably called "Shape 1"
- From the main menu, click LAYER/Layer Style/Color Overlay
- Use the Type Tool to type some text.
TO SAVE:
- In order to preserve the layers and to be able to manipulate, click FILE/Save as PSD.
- In order to use it in various software programs, click FILE/Export As.