Photoshop Tutorials: The Little Things to Improve your Designs
Objective & Purpose: Following are short tutorials on techniques that you can use to enhance your documents. My aim is to only include those that can take 10 minutes or less.
Tutorial# 1 || 2 || 3 || 4 || 5 || 6 || 7 || 8 More to come
#1 Tricks with Custom Shapes:
Using your imagination, you can do lots of enhancements with the Photoshop's custom vector shapes.
|
 Single |
|
 Combined for a more interesting shape |
#2 Got Shadows?
Here is an example of how you can simply duplicate a frame in order to add visual interest to it. Although I used a banner, you can use this technique on any number of shapes.
|
 Using almost the same instructions from the above tutorial, draw a banner or shape.
 #3 Don't Crop that Background
This one is more of a tip than a tutorial. Often we have large backgrounds that we want to keep in the design, but not want it to dominate or take up too much space. In the example below, notice how a semi-transparent rectangle is used in order to cover, but not conceal the water. The beauty of the Ravenel Bridge is still visible! I also used a hard black shadow behind the words to make them pop.

Click for larger image
#4 Get Warped
Using similar techniques from #2 above, you will create an interesting frame by skewing the rectangle and overlapping the text.

|
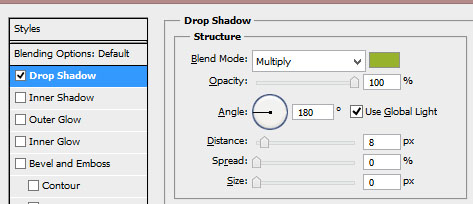
#5 Don't Default on that Shadow!
Fuzzy shadows are not the only way to go. Consider customizing the setting of the shadow. In this simple exercise, by using 180 degree and a hard shadow, the words seem to be lifted off of the page.

|
#6 Stand Out Quickly: Vignette Spotlight
There are a number of ways to create a vignette. This one is quick, and allows you to apply a kind of spotlight to make your subject stand out. See before and after below. This is only a subtle spotlight, but once you isolate the layers, you can apply other filters to the layer if you want to spotlight your subject even more.


|
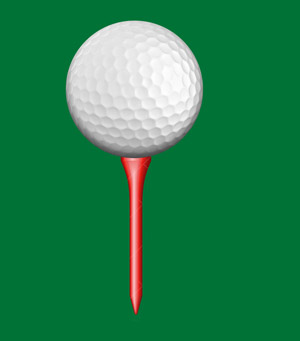
#7 Two Little Things:
In this exercise, you will learn how to select a sphere and how to make a flat image look more realistic with an inner shadow.
 Before |
 After |
- Find a flat or cartoony image of ball or sphere. Paste it against some kind of background.
- Select it in order to isolate:
- With the Ellipse tool, start dragging from approximate center....
- While dragging, hold down both ALT & SHIFT
(ALT is for center; SHIFT is to keep perfect circle) - If your selection needs re-sizing, choose SELECT/Modify/Expand
- To isolate, do one of these:
- SELECT/Inverse. Then Delete.
or
- LAYER/Layer Mask/Reveal Selection - To apply the shadow:
- LAYER/Layer Style. Choose Inner Shadow.
- Then alter the Distance, Size, and Angle to get the right look.
#8 Loving the Clips
I’m just in love with Clipping Masks, that’s all. So here’s another 5-minute design.
You can see from the Layers palette screenshot how this is done. In case you need a little help, here are the steps.


- New file
- Draw rectangle with Round Rectangle Tool (Shape Layer option)
- Draw the small orange rectangle with Rectangle Tool
- Stay on “orange rectangle”. On Layer Palette, choose Clipping Mask
- Change its color (ALT-BACKSPACE)
- Paste a picture. Make sure to have the round Rectangle layer selected.
Your pasted picture is still clipped because you were between the clipped layers. - Resize pasted picture as needed.
- Embellish as desired, for instance:
-reduce opacity of "small orange rectangle"
-type text on it; drop shadow the text so that it pops better
-place a gradient Stroke around the round rectangle