Photoshop Lesson
Instructions: Create a banner/masthead for a web page. Feel free to change the theme.

- Since this will be a collage, you should collect at least 4 pictures, whether you use them all or not.
- Start a file, about 300 X 900 px, with a white background. The large canvas gives you more room to work. You will crop or resize it later to about 850 X 200px.
- Add a new Layer.
- After the following steps, your layer will look similar to this, perhaps better:
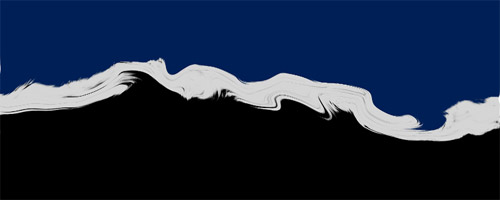
- Fill the entire layer with any color (I used black)
- Choose the Brush tool. Then display the Brush panel.
- Create a thick brush stroke in gray. (for example: Dry Media 20, Heavy Smear Wax Crayon)
- With the Magic Wand, select the top half . Fill with a different color (eg. dark blue)
- Deselect.
- Choose FILTER/Liquify. Then warp the gray line in the middle.
- Make the grid
- Start a new file 16 x 16 px, transparent background.
- Zoom to 1600%
- Use the pencil and draw a white line down the left and bottom.
- Choose EDIT/Define Pattern. OK
- Go back to your banner file.
- New Layer. Choose EDIT/Fill. Then choose your pattern.
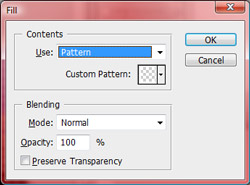
- The pattern is too intense. So change the opacity to about 20%.
- From the EDIT/Transform. Then practice one or more effects, such as Perspective or Warp.
- Add the other images as desired. Consider these things:
- Take your time with this part. It may take a while to get it right.
-
Be sure to make them blend smoothly.
-
Don't forget to use different methods to isolate the images.
-
Reducing opacity is another useful technique.
- Type the text as desired. Use an interesting font.
- Apply a Style (WINDOW/Style). I used "Fat Black and White" from the Text Effect styles; then I changed it a bit.
- Crop the file to 850 x 200px. (You'll need to move the layers inside so that they fit.)